
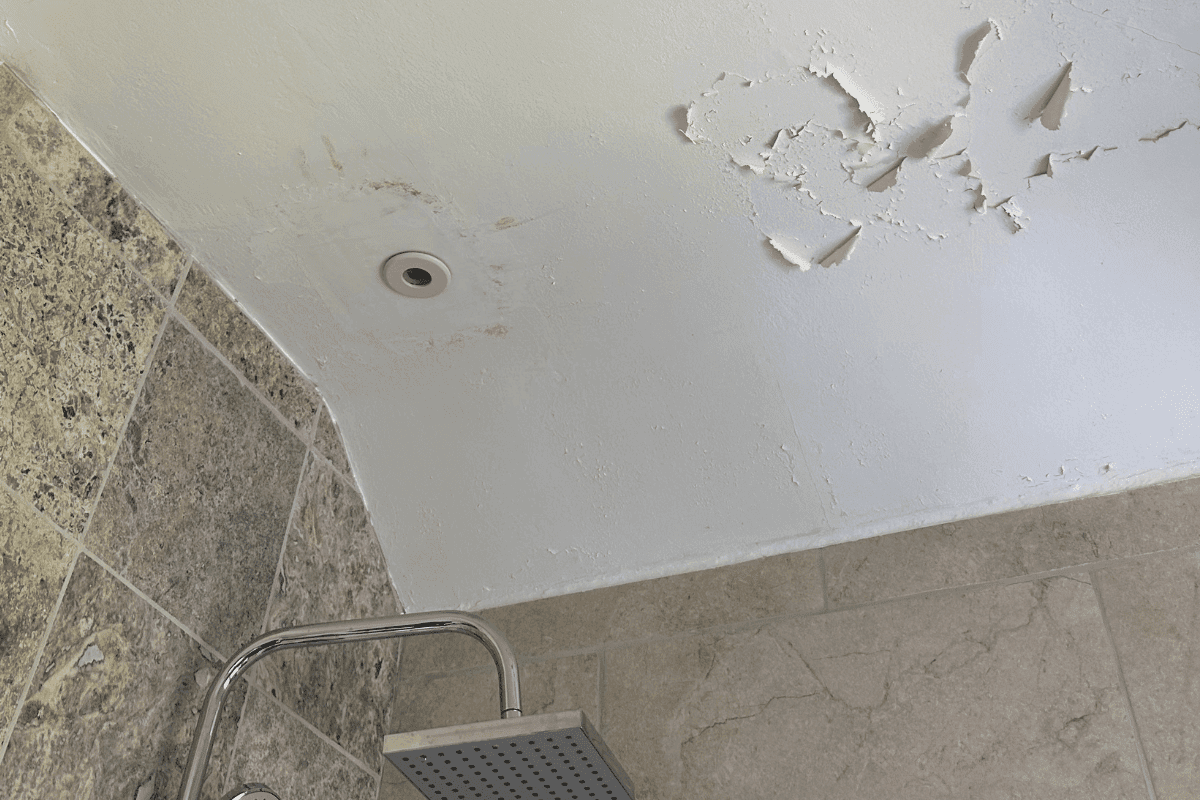
Paint doesn’t start peeling from a bathroom ceiling for no reason – something underneath is letting go.
Maybe it’s too much humidity trapped after showers, maybe the wrong primer was used, or maybe the paint just wasn’t built for a damp room.
Here’s how to figure out what’s really causing it, how to fix it properly, and how to stop it from coming back.
Key Notes
Poor ventilation causes most peeling; fans need 50-80 CFM vented outdoors.
Remove loose paint, feather-sand edges, and use bonding primer before applying bathroom-rated paint.
Replace soft, warped gypsum instead of repainting over structural damage.
Satin or semi-gloss finish sheds moisture better than flat ceiling paint.
Fast Diagnosis: What Is Causing Your Peeling?
Excess Humidity and Poor Ventilation
Warm, moist air rises and condenses on the coolest surface in the room, which is almost always the ceiling. Without an effective exhaust fan or openable window, the humidity lingers and starts breaking the bond between paint and substrate.
Improper Surface Preparation
Paint hates soap scum, dust, hairspray residue, and old loose paint. Skipping cleaning, deglossing, or priming invites early failure.
Wrong/Low‑quality Paint and Primer
Standard interior paints are not designed for constant steam. Bathroom‑rated paints and mildew‑resistant primers are.
Rushed Drying Times or Heavy Coats
Thick coats trap moisture. Recoating too soon prevents proper cure and can cause future blistering.
Underlying Damp or Leaks
Roof penetrations, plumbing lines above the ceiling, or a poorly sealed tub surround can feed constant moisture into the substrate.
Old, Brittle, or Overloaded Paint Layers
After years of repaints, layers can separate. A bonding primer or selective removal is often required.
Leak Or Just Humidity? How To Tell
Leak Signs: Brown or yellow halos with crisp edges, soft or swollen gypsum, sagging, bubbling that returns in the same spot, active drip, musty smell that does not go away.
Humidity Signs: General condensation after showers, no soft spots, no active drip, overall improvement when the room is aired out.
Before you paint, confirm the fan is vented outdoors, not into an attic. If in doubt, pause and investigate. Painting over an untreated leak is money down the drain.
Mold & Health Considerations
Mold is usually a co‑symptom of the same moisture that caused the peeling.
Small specks can be cleaned and sealed. Large or widespread growth, or anything affecting multiple rooms or HVAC paths, calls for professional remediation. Do not paint over active mold. Clean, dry, seal, then paint.
DIY Scope: Small, localized spots after you have solved the moisture source.
Call A Pro: Areas larger than roughly 10 square feet, recurring growth, strong musty odors, or when occupants have health sensitivities.
DIY Fix For Small, Non‑Leak Areas
If you have confirmed there is no active leak and the substrate is sound, here is the correct process:
Tools and Materials
You’ll need basic prep tools – a scraper, sandpaper, cleaner, primer, bathroom paint, and safety gear.
Step By Step:
Prep the room. Cover surfaces and set up ventilation. Run the fan and open a window if you can.
Remove all loose paint. Hold the scraper at about 30 degrees and lift only what is loose. Follow with a wire brush for stubborn edges.
Feather sand. Use 120 to 150 grit to blend the edges where paint remains. Vacuum or tack cloth the dust.
Clean thoroughly. Wash the ceiling with a mild detergent or TSP substitute to remove soap film and residue. If you see any spotting, treat it with a diluted bleach solution or a commercial mildew remover. Rinse and let the surface dry completely.
Patch and level. Fill divots or hairline cracks with lightweight joint compound. Let it dry, sand smooth, and remove dust.
Prime correctly. Choose the right primer for the scenario:
Stains or water marks: Zinsser B‑I‑N shellac or KILZ Original oil-based to block bleed‑through.
Peeling history or chalky paint: Zinsser Peel Stop or similar bonding sealer to lock down edges.
General bathroom sealing: Zinsser Bulls Eye 1‑2‑3 Plus or KILZ Premium with mildew resistance. Allow the primer to dry according to the label. Do not rush this.
Paint for humidity. Use a bathroom‑specific, mildew‑resistant paint in satin or semi‑gloss. Apply two thin coats with full dry time between. Keep the room ventilated during cure.
When Is Repainting Not Enough?
Repainting will not fix soft, crumbling, or warped gypsum. Consider section replacement if you have any of the following:
Persistent softness or swelling under the peeling area
Sagging gypsum or bulging seams
Deep mold that returns after cleaning
Repeated failures over the years, where layers will not stabilize
Replace with moisture‑resistant drywall for bathrooms. In heavy splash zones or where a shower was moved, cement board plus proper waterproofing under tile is the right approach.
The Right Products That Prevent A Repeat
Primers By Scenario:
Stain Blocking: Zinsser B‑I‑N shellac, KILZ Original. These lock in tannin and water marks.
Bonding over Compromised Layers: Zinsser Peel Stop to stabilize remaining edges.
General Sealing with Mildew Resistance: Zinsser Bulls Eye 1‑2‑3 Plus, KILZ Premium.
Bathroom Paints We Trust:
Zinsser Perma‑White Mold & Mildew‑Proof Interior Paint
Benjamin Moore Aura Bath & Spa
Sherwin‑Williams Duration Home Interior Acrylic Latex
Behr Premium Plus Ultra Bathroom line
KILZ Kitchen & Bath
Choose satin or semi‑gloss for the ceiling. These finishes shed moisture better and clean more easily than flats.
Ventilation That Works
Ventilation is the fix that keeps your work from failing.
Size The Fan: Bathrooms typically need 50 to 80 CFM, but size it according to the room volume. Larger rooms or those with separate toilet enclosures may need more.
Keep It Running: A timer switch that runs 15 to 30 minutes after a shower clears lingering steam. Humidity‑sensing fans automate this.
Vent Outside: The duct should discharge outdoors, not into an attic or crawl space where moisture will cause new problems.
If A Fan Is Impossible: Openable windows, small dehumidifiers, and better airflow habits help, but plan a fan when you can.
Common Mistakes To Avoid
Painting over damp surfaces or active mold.
Skipping primer on patches or over joint compound.
Using generic flat ceiling paint instead of bathroom‑rated coatings.
Heavy coats and rushed recoat times.
Ignoring a slow leak or a fan that barely moves air.
Costs, Timelines & When To Call A Pro
DIY Cost Ranges
Small patch and repaint of a few square feet: Typically low material cost with primer and a quart of bathroom paint.
Larger areas or multiple patches: Plan for gallons, bonding primer, and patch materials.
Timelines
Proper workflow with cure times usually spans 2–3 days, even if hands‑on work totals only a few hours. Dry time matters.
When A Pro Pays Off
Widespread peeling, recurring failures, or suspected leaks
Soft substrate, sagging, or deep mold involvement
You want a durable fix with stain blocking, correct primers, and a clean finish in one coordinated visit
Frequently Asked Questions
Why does paint peel faster near my shower even if the rest of the ceiling looks fine?
That area takes the brunt of rising steam and heat, so humidity lingers longer. Without a fan directly pulling moisture out, condensation keeps softening the paint film until it lifts.
Can ceiling texture (like popcorn or orange peel) cause paint to peel sooner?
Yes, textured surfaces trap moisture in their crevices and are harder to clean or fully prime. Moisture sits longer, which can weaken paint adhesion over time.
Is there a difference between ceiling and wall paint for bathrooms?
Definitely. Ceiling paints are formulated thicker and spatter-resistant, while wall paints focus on washability. For a bathroom, both should still be labeled “bath & spa” or “moisture-resistant.”
How can I tell if my exhaust fan is working?
Hold a tissue up to the fan grille while it’s running. If it sticks firmly, airflow is good. If it drops or barely moves, the fan or duct is clogged and needs cleaning or replacement.
Ceiling Peeling & Don’t Know Where To Start?
We’ll inspect, diagnose & fix what you need – on your schedule.
Conclusion
Bathroom ceiling paint peeling usually starts small – a few flakes near the shower, a bubble above the vent – but it’s a sign that moisture has been overstaying its welcome.
The long-term fix isn’t just a coat of new paint, but proper prep, the right primer, and ventilation that moves air out of the room. Get those parts right once, and the ceiling stays solid for years instead of months.
Get a quote from our licensed team and we’ll take care of the entire job – from assessing moisture and prepping the surface to priming, painting, and making sure the ceiling lasts.


RemodelCo is the go-to remodeler in Salt Lake City for everything from basement finishes, kitchen remodels, bathroom remodels to small repairs. Reliable, responsive, and built on quality craftsmanship.
Join our team
Get A Free Quote
9480 S Union Square, Suite 203, Sandy, UT 84070
Services
Interior Services
Exterior Services
Real Estate Pros
Consulting
© Copyright
RemodelCo LLC All Rights Reserved.